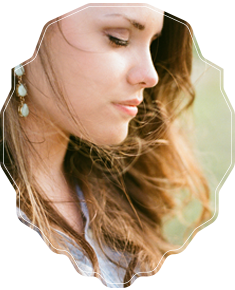
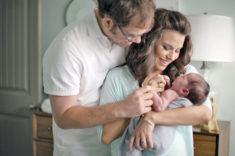
Hi ya’ll! This week’s Before Meets After will focus on airbrushing, and how it’s done in the world of Alyse! To start, let’s take a look at this original, SOOC image, taken a couple weeks back, at a workshop I’m planning to write about this weekend!
.jpg "workshop91_raw")

It’s no question that Liz already has amazing skin and a gorgeous glow about her. But you can always, always, always do something to enhance an image so your bride feels the most beautiful she’s ever felt! So let’s get to it!
Before getting down and dirty with airbrushing, a little reminder: I shoot raw, convert to .JPG in Photoshop, and use my trusty Totally Rad Actions to get the job done. What results is a much faster workflow, and good, quality images. No complaints here! After you’re done color-correcting your images, always (and I mean always) sharpen them! (It also helps to have a tac-sharp prime lens! Aka, my precious little 50mm 1:4.) As you’ll see, I’ve also enhanced Liz’s eyes just a tad using TRA‘s Select-O-Pop (amazing tool!). The trick is to never use 100% opacity. Always work in layers. And try to stay anywhere between 20 and 50%.
Now for the fun stuff! Airbrushing! Dun, dun, DUN!! This used to be SO daunting to me. (Sometimes still is.) But here is my technique. (Please note that this is only MY technique, and there are a myriad ways of getting the same result!)
First… You’ll usually want to use your spot healing brush to get rid of any blemishes or flaws. (On Liz, I really didn’t have to, but it’s a good habit of using the spot healing brush before going further!) Then create a duplicate layer by dragging your background layer onto the “Create a new layer” portion of the layers palette. (Wow, how many times could I possibly say “layer” in the same sentence?) Once you’ve gotten this far, go to Filter (in your top menu) and then Blur, and then Surface Blur.
.jpg "surface blur")
After selecting Surface Blur, you’ll want to tweak your radius and threshold settings until you get your desired effect. This puts an overall blur on the entire surface of your image, hence, “Surface Blur.” Click OK!
.jpg "surface blur 2")
After this step, it is muy importante to go back up to Filter > Blur and then select Smart Blur, as it smoothes any edges within your photograph without adversely affecting image sharpness or fine detail.
![]()
Once there, you’ll again have to tweak your settings. But make sure your preview window is zoomed in on an edge in your photograph!
![]()
You may be thinking, “Why is Alyse studying the ‘Theories of Attribution, and Fritz Heider’s Naïve Theory’?” (I was in psych class when this screen shot was taken.. Woops!). Or more likely, you may be thinking, “Why on earth would I want my entire image to be one huge blur?!” Well here’s the coolest thing about Photoshop.. You can create Layer Masks! (More about that in a second.) Go to Layer > Layer Mask > Hide All, as seen below.
![]()
By selecting Hide All, you’ve told Photoshop to replace your current blurred layer with an imaginary black layer. Woah, WHAT?!?! Let me try to explain a little more. You will not actually see any black on your image. Here’s how I like to think of layer masks… Black and white are the default colors for layer masks. A black layer mask hides all, while a white layer mask reveals all. You might also think of it this way: Black = darkness = no visibility; and white = light = visibility. Do you follow? If you check out your layer palette, like in the image below, you’ll see your current layer has black layer linked to it. This is your mask. So how do you airbrush? You select your paintbrush tool from the left, use your left and right brackets to increase/decrease the size of your brush, bring brush hardness down to a minimum via the menu underneath File, Edit, and so on, and then simply paint on your airbrush. One word of caution, you must be painting with the color white for any of this to work, because after all, white is what enables you to see your blur layer, and thus, your airbrush. As you can see, I’ve only done one side of Liz’s face so you can tell the difference.
![]()
I then tend to take my eraser tool (at around 50% opacity) and use it on most of the edges in my photo (i.e., the nose, the lips, the eyes, dimples, etc.). The final step is to change your current layer from “Normal” (within the layers palette) to “Luminosity.” And then just adjust opacity as needed (especially if you feel like you overdid it just a tad), and you’re ready to watermark and show the world!
![]()
And the final image, complete with sharpening, airbrushing, and eye enhancement is..
![]()
I know this seems like a long and tedious process. It can be. But if you do it enough, you won’t even have to think about it. If this will help just one person, I’ll be happy. If not, remember, there are tons of different airbrushing techniques, and this is just mine. :)
If you have any questions pertaining to my workflow in or out of Photoshop, or anything else you’d like me to cover, ask in the comment section, and I’ll get to it next week!
Happy Friday!!
Rae - SO cool. :) My sister is talented :)
Jess - So… the last time air brushing was talked about in a class was Tony’s class, which was a tad all over the place. This is much nicer, with step-by-step instructions AND diagrams! Attention to detail for sure! PROPS to you my dear!